How to Wire a 3-Way Light Switch
3-way switch diagrams and instructions to change a single-pole switch to a 3-way switch.
![]() Time
Time
A full day
![]() Complexity
Complexity
Intermediate
![]() Cost
Cost
$51–100
Introduction
This story features diagrams that show how to wire 3-way switches. The wiring is more complicated than a traditional single-pole switch, but we'll explain how to make the connections. Once you're done, you'll be able to control a light from two switches.
Tools Required
Materials Required
- 14-3 or 12-3 cable
- Three-way switches (2)
Wiring a 3-Way Light Switch
Wiring a 3-way light switch is certainly more complicated than that of the more common single-pole switch, but you can figure it out if you follow our 3-way switch wiring diagram.
With a pair of 3-way switches, either can make or break the connection that completes the circuit to the light. The whole wiring a light switch project can be completed in a few hours if you don't have to do any drywall removal and repair.
Keep reading and learn how to wire a light switch. Also, use the 3-way switch wiring diagram to learn light switch wiring.
For a Visual Walkthrough of How to Wire a 3-Way Light Switch, Watch this Video:
ⓘ
Project step-by-step (5)
Step 1
Directions for Wiring a 3-Way Light Switch Yourself:
To add the switch, you'll use one of two wiring a light switch diagrams (shown below), depending on whether the power comes to your light switch first (the most common situation) or to the light fixture first. Either way, complete these five steps for 3-way light switch wiring:
- Turn off the correct circuit at your electrical panel.
- Add an electrical box for the second 3-way switch in the basement.
- Pro tip: It's likely you'll also need to replace the existing switch box with a larger one to accommodate the extra wires for the 3 way switch.
- Feed a length of 14-3 type NM cable (or 12-3, if you're connecting to 12-gauge wire) between the two boxes. The 14-3 cable has three insulated conductors: white, black and red (plus a bare ground wire).
- Connect the wires to the new 3-way switches with ground screws using one of the two wiring diagrams (Fig. A or B).
- Pro tip: The switches will be identified by a label on the common terminal and/or the terminal screw will be a different color.
- Make sure to wrap black electrical tape around the ends of all white wires used as travelers between the 3-way switches. If you have the setup shown in Fig. A, also wrap black tape around the white wire from the switch to the light.
- Pro tip: This way, you and others will know these wires are "hot" and not neutral like most white wires.
If you have aluminum wiring, call in a licensed pro who's certified to work with it. This wiring is dull gray, not the dull orange that's characteristic of copper.
Step 2
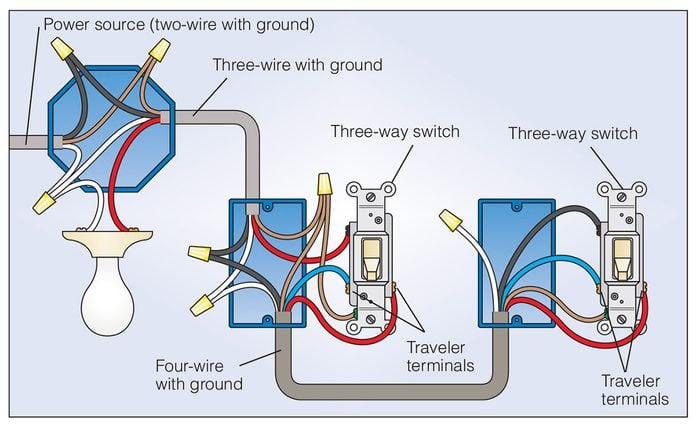
Figure A: 3-Way Switch Wire Diagram — Power to Light Fixture
This 3-way light switch wiring diagram shows how to do the light switch wiring and the light when the power is coming to the light fixture.
- In this diagram, power enters the fixture box.
- The black hot wire connects to the far right switch's common terminal.
- Red and blue wires link traveler terminals of both switches.
- The red wire, which is connected to the first switch's common terminal, leads back to the fixture.
Sign Up For Our Newsletter
Complete DIY projects like a pro! Sign up for our newsletter!
Do It Right, Do It Yourself!
![]()
Step 3
Figure B: 3-Way Switch Wire Diagram — Power to Light Switch
This 3 way switch wiring diagram shows how to wire the switches and the light when the power is coming to the light switch.
- In this diagram, the incoming hot wire attaches to the first switch's common dark-colored terminal.
- The two hot wires of three-wire cable connect to a pair of brass-colored traveler terminals on each switch.
- The fixture's hot wire connects to the second switch's common terminal.

Step 4
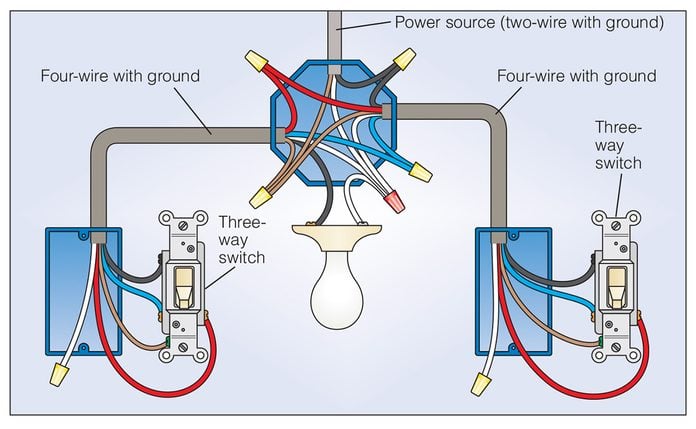
Figure C: 3-Way Switch Wire Diagram — Power to Light Switch with Fixture Between Switches
In this diagram, power enters the fixture box.
- The incoming hot wire is connected to the right switch's common terminal.
- Two lengths of four-wire with ground cable, joined at the fixture box, link the right and left switch traveler terminals to each other and to the fixture.
Step 5
Next, Watch a Video to Learn How to Replace a 3-Way Switch:
Family Handyman editor Rick Muscoplat will teach you how to replace a 3 way switch and share a tip to make this job a piece of cake.
Similar Projects
Source: https://www.familyhandyman.com/project/how-to-wire-a-threeway-switch/
Posted by: fernandostolliffind.blogspot.com
